facebook twitter youtube facebook facebook facebook

E-Mail : info@askmlabs.com

Phone : +1.215.353.8306

Latest Post
Showing posts with label database 18c. Show all posts

ACFS Mount Missing On Exadata - ACFS-02017 , CLSU-00101

Written By askMLabs on Wednesday, September 12, 2018 | 8:50 PM

This post talks about an Exadata RAC ASM issue. This issue is observed after completing Exadata patching.  It is observed that the ACFS mount point is missing. The following steps explains how we identified the issue and How can we troubleshoot this issue.

This is a 8 node Exadata full rack. The ACFS mount point is missing on first node , but all other 7 nodes have this ASM mount point.


First try to get the missing mount point …

Use “df –h” on any node where you can see the ACFS mount point. In our case getting the ACFS mount point details from node2 exaaskmdb02


[root@exaaskmdb02 ~]# df -h /u01/app/askmacfs
Filesystem            Size  Used Avail Use% Mounted on
/dev/asm/askmdata-282  512G   64G  449G  13% /u01/app/askmacfs
[root@exaaskmdb01 ~]#


Check1 :

Using these details, try to manually mount the ACFS on node1 exaaskmdb01


[root@exaaskmdb01 ~]# mount -t acfs /dev/asm/askmdata-282  /u01/app/askmacfs
mount.acfs: CLSU-00100: operating system function: open64 failed with error data: 2
mount.acfs: CLSU-00101: operating system error message: No such file or directory
mount.acfs: CLSU-00103: error location: OOF_1
mount.acfs: CLSU-00104: additional error information: open64 (/dev/asm/askmdata-282)
mount.acfs: ACFS-02017: Failed to open volume /dev/asm/askmdata-282. Verify the volume exists.
[root@exaaskmdb01 ~]#


We are not able to mount the ACFS mountpoint. The first approach for any troubleshooting is to analyze the error messages. Cetain times, there could be useful error messages, which can directly help to point to the issue. But sometimes, the error messages may not help to focus on the real issue , rather informational messages. Your experience will count a lot in these scenarios where you should be able to relate the error message to the issue.


Check2:

The error message which caught to our attention is “No such file or directory”. Now our next check will be to check the directories…

On exaaskmdb01 check the directories  /dev/asm/askmdata-282 and /u01/app/askmacfs

[root@exaaskmdb01 ]# ls -lrt /dev/asm/askmdata-282
ls: cannot access /dev/asm/askmdata-282: No such file or directory

[root@exaaskmdb01 ]# ls -ld /u01/app/askmacfs
drwxrwxr-x 11 grid oinstall 4096 May  9 12:00 /u01/app/askmacfs


Same thing, verify on any other node ( 2-8)

[root@exaaskmdb02 ]# ls -lrt /dev/asm/askmdata-282
brwxrwx--- 1 root asmadmin 248, 144385 Sep 12 15:33 /dev/asm/askmdata-282

[root@exaaskmdb02 ]# ls -ld /u01/app/askmacfs
drwxrwxr-x 11 grid oinstall 4096 May  9 12:00 /u01/app/askmacfs


From the above check, it is clear that node1 exaaskmdb01 is missing a directory. Now lets check further how to bring this directory. As these are ACFS mounts, there could be possibility that these are missing due to ACFS drivers not loading properly during node reboot. Let’s concentrate on the ACFS drivers….


Check3:

Check acfs modules to be loaded …

[root@exaaskmdb01 ~]# lsmod | grep oracle
oracleacfs           4825088  0
oracleadvm            806912  3
oracleoks             659456  2 oracleacfs,oracleadvm


This check looks good, the acfs drivers are loaded properly. The next check would be to check the ACFS volume informaiton.

Check4:

ASMCMD> volinfo --all
Diskgroup Name: ASKM_DG

         Volume Name: ASKMDATA
          Volume Device: /dev/asm/askmdata-282
          State: DISABLED                               <<<< Check this. This volume is disabled.
          Size (MB): 524288
          Resize Unit (MB): 64
          Redundancy: MIRROR
          Stripe Columns: 8
          Stripe Width (K): 1024
          Usage: ACFS
          Mountpath: /u01/app/askmacfs


From the above output, we get that the volume is disabled. Now let’s check the same thing on the other nodes exaaskmdb02-08


[grid@exaaskmdb02 ~]$ asmcmd
ASMCMD> volinfo --all
Diskgroup Name: ASKM_DG

         Volume Name: ASKMDATA
          Volume Device: /dev/asm/askmdata-282
          State: ENABLED                     <<< It is enabled on node2
          Size (MB): 524288
          Resize Unit (MB): 64
          Redundancy: MIRROR
          Stripe Columns: 8
          Stripe Width (K): 1024
          Usage: ACFS
          Mountpath: /u01/app/askmacfs


From the above check4, we understood that this is due to the reason that the volume is not enabled by default after patching. Now we need to enable this volume and mount this ACFS manually.


Solution

ASMCMD> volenable -G ASKM_DG -a
ASMCMD> volinfo --all
Diskgroup Name: ASKM_DG

         Volume Name: ASKMDATA
          Volume Device: /dev/asm/askmdata-282
          State: ENABLED
          Size (MB): 524288
          Resize Unit (MB): 64
          Redundancy: MIRROR
          Stripe Columns: 8
          Stripe Width (K): 1024
          Usage: ACFS
          Mountpath: /u01/app/askmacfs

ASMCMD> exit
[grid@exaaskmdb01 ~]$ ls -lrt /dev/asm/askmdata-282
brwxrwx--- 1 root asmadmin 248, 144385 Sep 12 15:56 /dev/asm/askmdata-282

[root@exaaskmdb01 ~]# ls -ld /u01/app/askmacfs
drwxrwxr-x 2 grid oinstall 4096 Mar 18  2016 /u01/app/askmacfs

[root@exaaskmdb01 ~]# mount -t acfs /dev/asm/askmdata-282 /u01/app/askmacfs

[root@exaaskmdb01 ~]# df -h /u01/app/askmacfs
Filesystem            Size  Used Avail Use% Mounted on
/dev/asm/askmdata-282  512G   64G  449G  13% /u01/app/askmacfs
[root@exaaskmdb01 ~]#


That’s it. We fixed the issue.


Questions to the readers

Q1) Where do you find the ASM related modules/drivers on Linux OS ?

Q2) What to do if you find any missing ASM modules/drivers on Linux OS ?

Q3) How to load the asm drivers if they were not loaded by default during node reboot ?


Refer to my other post <Place Holder> which is similar to this issue , but happened during our exa grid upgrade from 12.1.0.2 to 12.2.0.1.


Hope this information helps….

Oracle Database 18c Upgrade Using DBUA

Written By askMLabs on Monday, September 10, 2018 | 11:02 PM

In this post, we will discuss about Oracle Database 18c upgrade from 12.1.0.2 to 18.0.0.0. Though the upgrade using DBUA is simple, we need to consider many other points based on your environment. Those points really vary from environment to environment. The purpose of this post is to give you the introduction to the process of database upgrade. I have few other posts where I explained manual upgrade process.
We assume for this post, that we already have a Non-CDB database 12.1.0.2 up and running on linux OS. We also assume that Oracle Database Vault and Oracle Label Security are not enabled in this database. We have another post that describes the Database Vault and Oracle Label Security considerations when upgrading a database.

For reference, note the direct upgrade path.
direct upgrade path

1.Pre-Upgrade Tasks
1.1 Verify all the components status
Use the following command to list the Database components status along with version.
SQL> select substr(comp_name,1,40) comp_name, status, substr(version,1,10) version from dba_registry order by comp_name;

SQL> select substr(comp_name,1,40) comp_name, status, substr(version,1,10) version from dba_registry order by comp_name;
COMP_NAME                                     STATUS               VERSION
--------------------------------------------- -------------------- ----------
JServer JAVA Virtual Machine                  VALID                12.1.0.2.0
OLAP Analytic Workspace                       VALID                12.1.0.2.0
Oracle Application Express                    VALID                4.2.5.00.0
Oracle Database Catalog Views                 VALID                12.1.0.2.0
Oracle Database Java Packages                 VALID                12.1.0.2.0
Oracle Database Packages and Types            VALID                12.1.0.2.0
Oracle Database Vault                         VALID                12.1.0.2.0
Oracle Label Security                         VALID                12.1.0.2.0
Oracle Multimedia                             VALID                12.1.0.2.0
Oracle OLAP API                               VALID                12.1.0.2.0
Oracle Real Application Clusters              OPTION OFF           12.1.0.2.0
Oracle Text                                   VALID                12.1.0.2.0
Oracle Workspace Manager                      VALID                12.1.0.2.0
Oracle XDK                                    VALID                12.1.0.2.0
Oracle XML Database                           VALID                12.1.0.2.0
Spatial                                       VALID                12.1.0.2.0


1.2 Disable the custom triggers that would fire before/after DDL and enable them after the upgrade is complete.
1.3 Take database backup.
Based on your exisint backups strategy, complete the level0 backup. We always prefer consistant RMAN level0 backup if the downtime is offordable. If downtime is not allowed for database , complete RMAN level0 backup.
1.5 Check invalid objects and run utlrp.sql script if you have any invalids
Use the following command to check the database invalids. Run utlrp.sql script to correct any invalids.
SQL> select name,user from v$database;
SQL> create user askm_upg_usr identified by xxxxxxx account unlock;
SQL> grant connect,resource to askm_upg_usr;
SQL> grant dba to askm_upg_usr;
SQL> create table askm_upg_usr.source_dba_objects as select * from dba_objects;
SQL> select count(1) from askm_upg_usr.source_dba_objects;
SQL> break on report
SQL> compute sum of INVALIDS on report
SQL> select owner,count(object_name) INVALIDS from dba_objects where status ='INVALID' group by owner;
SQL> create table askm_upg_usr.invalids_preupg as (select owner,object_name,object_type from dba_objects where status='INVALID');
SQL> select count(*) from askm_upg_usr.invalids_preupg;
SQL> select count(*) from dba_objects where status='INVALID';

1.6 Verify the time zone.
Oracle database 1bc brings time zone file 26. So you have the option, either you can upgrade time zone after completing database upgrade or during the database upgrade.
SELECT version FROM v$timezone_file;
From 18.1 onwards, timezone upgrade scripts are included in the target ORACLE_HOME under rdbms/admin directory.

1.7 Gather optimizer statistics
The optimizer statistics are gathered using the following command…
SQL> EXEC DBMS_STATS.GATHER_DICTIONARY_STATS;
1.8 Truncate audit records ( to avoid hanging issues while upgrading)
SQL> truncate table sys.aud$;
SQL> truncate table sys.fga_log$;

1.9 Run pre-upgrade inforation tool preupgrade.jar. ( Doc ID 884522.1 )
You can run preupgrade scripts that the Pre-Upgrade Information Tool generates to fix many issues before you upgrade to the new Oracle Database release.
$ORACLE_HOME/jdk/bin/java -jar  /tmp/askm/preupgrade.jar TERMINAL TEXT
The output of this command is copied in the section scripts output. Refer to the output listed in this post. Refer the “PREUPGRADE SUMMARY”. This scripts generate the fixup scripts. Run the preupgrade_fixups.sql before upgrade.

SQL> @/u01/app/oracle/cfgtoollogs/ASKM/preupgrade/preupgrade_fixups.sql


1.10 Check the accounts use Case-Insensitive password version
Use the following query to find the user accounts that use case-insensitive version.
SELECT USERNAME,PASSWORD_VERSIONS FROM DBA_USERS;
If you find any user account that use case-insensitive version, refer the Oracle Document for steps to complete.
2.Upgrade Using DBUA
2.1 Install database 18c software only installation in a new oracle home.
Before starting the Database upgrade, we need to install the Database 18c software binaries. We have different posts that explains the detailed procedure to install Oracle Database 18c binaries. Refer my other posts
Oracle Database 18c Simple Installation , Install Oracle Database 18c In Silent Mode and Install Oracle Database 18c In Silent Mode Part2. What is new with Oracle Database 18c software ? What is image based software ?


[oracle@askmdb ~]$ echo $ORACLE_HOME
/u01/app/oracle/product/12.1.0/dbhome_1
[oracle@askmdb ~]$ mkdir -p /u01/app/oracle/product/18.0.0/dbhome_1
[oracle@askmdb ~]$ cd /u01/app/oracle/product/18.0.0/dbhome_1
[oracle@askmdb dbhome_1]$


[oracle@askmdb dbhome_1]$ unzip /mnt/software/Database/Oracle_Database_18.0.0.0.0_sw/V978967-01.zip

Edit the file db_install.rsp from the new software image extracted above , for software installation.
[oracle@askmdb response]$ diff db_install.rsp db_install.rsp_18AUG2018
29c29
< oracle.install.option=INSTALL_DB_SWONLY
---
> oracle.install.option=
34c34
< UNIX_GROUP_NAME=oinstall
---
> UNIX_GROUP_NAME=
41c41
< INVENTORY_LOCATION=/u01/app/oraInventory
---
> INVENTORY_LOCATION=
45c45
< ORACLE_HOME=/u01/app/oracle/product/18.0.0/dbhome_1
---
> ORACLE_HOME=
50c50
< ORACLE_BASE=/u01/app/oracle
---
> ORACLE_BASE=
62c62
< oracle.install.db.InstallEdition=EE
---
> oracle.install.db.InstallEdition=
79c79
< oracle.install.db.OSDBA_GROUP=dba
---
> oracle.install.db.OSDBA_GROUP=
85c85
< oracle.install.db.OSOPER_GROUP=oper
---
> oracle.install.db.OSOPER_GROUP=
90c90
< oracle.install.db.OSBACKUPDBA_GROUP=backupdba
---
> oracle.install.db.OSBACKUPDBA_GROUP=
95c95
< oracle.install.db.OSDGDBA_GROUP=dgdba
---
> oracle.install.db.OSDGDBA_GROUP=
100c100
< oracle.install.db.OSKMDBA_GROUP=kmdba
---
> oracle.install.db.OSKMDBA_GROUP=
105c105
< oracle.install.db.OSRACDBA_GROUP=racdba
---
> oracle.install.db.OSRACDBA_GROUP=
[oracle@askmdb response]$

[oracle@askmdb dbhome_1]$ ./runInstaller -silent -responseFile /u01/app/oracle/product/18.0.0/dbhome_1/install/response/db_install.rsp

Run root.sh to complete the software installation.

[root@askmdb ~]# /u01/app/oracle/product/18.0.0/dbhome_1/root.sh


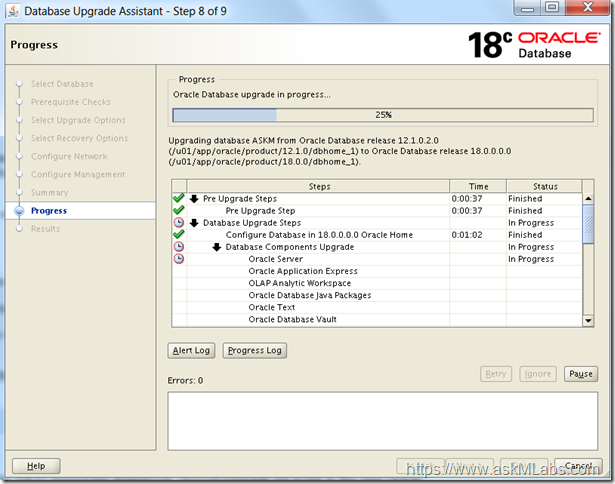
2.2 Set ORACLE_HOME and invoke DBUA from the 18c binaries installed above.
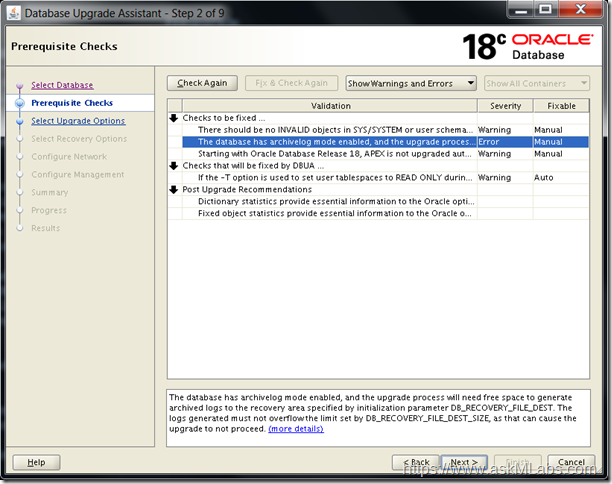
Oracle Database 18c Upgrade
Oracle Database 18c UpgradeOracle Database 18c UpgradeOracle Database 18c Upgrade

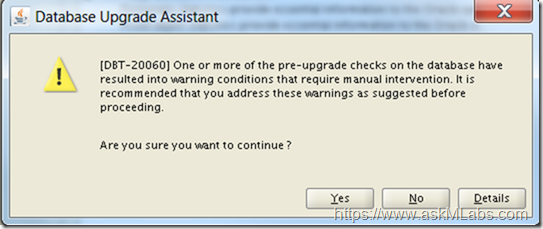
You can’t proceed with the upgrade unless you correct those warnings/errors.  I have manually corrected those errors.


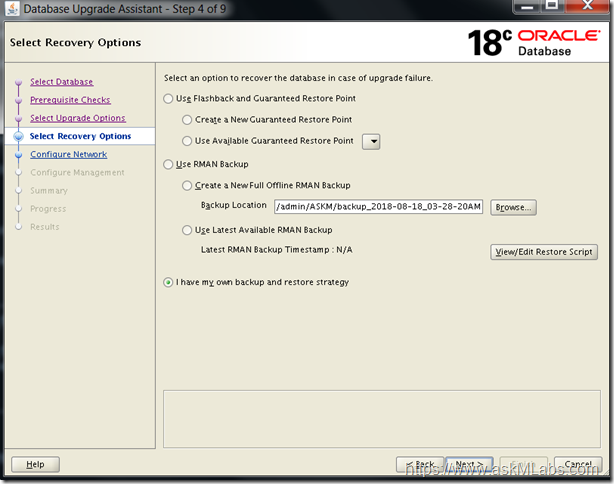
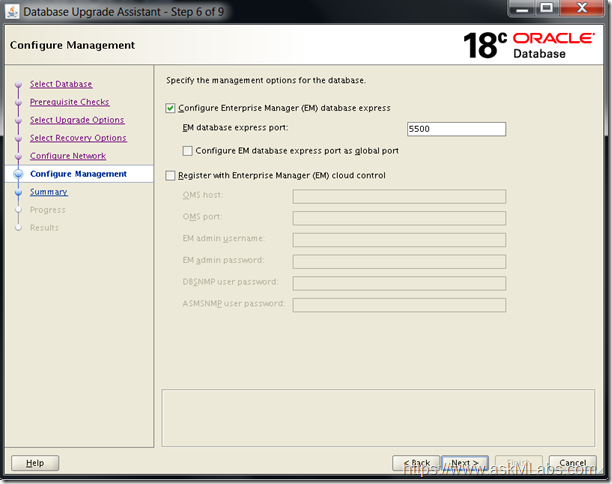
Oracle Database 18c UpgradeOracle Database 18c UpgradeOracle Database 18c UpgradeOracle Database 18c UpgradeOracle Database 18c UpgradeOracle Database 18c Upgrade

3.Post-Upgrade Tasks
3.1 Verify for any invalid objects and run the utlrp.sql
Run the following commands to verify the invalids and run the utlrp.sql script to correct the invalids.
SQL> select count(*) from askm_upg_usr.INVALIDS_preupg;
SQL> select count(*) from dba_objects where status='INVALID';
SQL> set linesize 132
SQL> column object_name format a30
SQL> column object_type format a25
SQL> column owner format a20
SQL> select object_name,object_type,owner from dba_objects a where status = 'INVALID' and not exists (select 0 from askm_upg_usr.INVALIDS_preupg b where b.object_name=a.object_name and b.owner=a.owner);

3.2 Run the post upgrade fixup script.
Run the postupgrade_fixups.sql which is generated as part of the script pre-upgrade information tool preupgrade.jar.
SQL> @/u01/app/oracle/cfgtoollogs/ASKM/preupgrade/postupgrade_fixups.sql


3.2 Check if you have any special instructions specific to your environment and complete all the steps.
3.3 Post upgrade verification steps
SQL> select instance_name,status from v$instance;
INSTANCE_NAME    STATUS
---------------- ---------------
ASKM             OPEN

SQL> select substr(comp_id,1,15) comp_id,substr(comp_name,1,30) comp_name,substr(version,1,10) version,status from dba_registry order by modified;
COMP_ID         COMP_NAME                                     VERSION         STATUS
--------------- --------------------------------------------- --------------- ---------------
APEX            Oracle Application Express                    4.2.5.00.0      VALID
CATALOG         Oracle Database Catalog Views                 18.0.0.0.0      UPGRADED
CATPROC         Oracle Database Packages and T                18.0.0.0.0      UPGRADED
XML             Oracle XDK                                    18.0.0.0.0      UPGRADED
CATJAVA         Oracle Database Java Packages                 18.0.0.0.0      UPGRADED
APS             OLAP Analytic Workspace                       18.0.0.0.0      UPGRADED
OLS             Oracle Label Security                         18.0.0.0.0      UPGRADED
DV              Oracle Database Vault                         18.0.0.0.0      UPGRADED
CONTEXT         Oracle Text                                   18.0.0.0.0      UPGRADED
OWM             Oracle Workspace Manager                      18.0.0.0.0      UPGRADED
RAC             Oracle Real Application Cluste                18.0.0.0.0      UPGRADED
XDB             Oracle XML Database                           18.0.0.0.0      UPGRADED
ORDIM           Oracle Multimedia                             18.0.0.0.0      UPGRADED
SDO             Spatial                                       18.0.0.0.0      UPGRADED
XOQ             Oracle OLAP API                               18.0.0.0.0      UPGRADED
JAVAVM          JServer JAVA Virtual Machine                  18.0.0.0.0      VALID

16 rows selected.
SQL> select owner, object_name, object_type from dba_invalid_objects order by owner, object_type;
no rows selected

SQL> EXEC DBMS_STATS.GATHER_DICTIONARY_STATS;
PL/SQL procedure successfully completed.
SQL> execute dbms_stats.gather_fixed_objects_stats;
PL/SQL procedure successfully completed.

4. Troubleshooting Oracle Upgrades and Rerunning Failed upgrades
There could be possibilities that you may land into different upgrade issues. The upgrade process has been improved from version to version that we can re-run the failed upgrade process using DBUA again. You can re-run or restart Oracle Database upgrade phases by using Database Upgrade Assistant (DBUA).
Logfiles for the upgrade process can be found at location :   $ORACLE_BASE/cfgtoollogs/$ORACLE_SID
5.Issues and Resolutions
Issue-1
[oracle@askmdb dbhome_1]$ ./runInstaller -silent -responseFile /u01/app/oracle/product/18.0.0/dbhome_1/install/response/db_install.rsp
Launching Oracle Database Setup Wizard...

[FATAL] [INS-35341] The installation user is not a member of the following groups: [backupdba, dgdba, kmdba, racdba]
    CAUSE: The installation user account must be a member of all groups required for installation.
    ACTION: Ensure that the installation user is a member of the system privileges operating system groups you selected.
[oracle@askmdb dbhome_1]$ vi /u01/app/oracle/product/18.0.0/dbhome_1/install/response/db_install.rsp
[oracle@askmdb dbhome_1]$
Solution :
Modify the oracle user to be part of the groups backupdba, dgdba, kmdba, racdba

6.References
Important Notes :
<Place Holder>
Scripts Output :
Session Output for DB Software Installation :
[oracle@askmdb dbhome_1]$ ./runInstaller -silent -responseFile /u01/app/oracle/product/18.0.0/dbhome_1/install/response/db_install.rsp
Launching Oracle Database Setup Wizard...

[WARNING] [INS-13014] Target environment does not meet some optional requirements.
    CAUSE: Some of the optional prerequisites are not met. See logs for details. /u01/app/oraInventory/logs/InstallActions2018-08-18_03-04-54AM/installActions2018-08-18_03-04-54AM.log
    ACTION: Identify the list of failed prerequisite checks from the log: /u01/app/oraInventory/logs/InstallActions2018-08-18_03-04-54AM/installActions2018-08-18_03-04-54AM.log. Then either from the log file or from installation manual find the appropriate configuration to meet the prerequisites and fix it manually.
The response file for this session can be found at:
  /u01/app/oracle/product/18.0.0/dbhome_1/install/response/db_2018-08-18_03-04-54AM.rsp

You can find the log of this install session at:
  /u01/app/oraInventory/logs/InstallActions2018-08-18_03-04-54AM/installActions2018-08-18_03-04-54AM.log

As a root user, execute the following script(s):
         1. /u01/app/oracle/product/18.0.0/dbhome_1/root.sh

Execute /u01/app/oracle/product/18.0.0/dbhome_1/root.sh on the following nodes:
[askmdb]


Successfully Setup Software with warning(s).
[oracle@askmdb dbhome_1]$

root.sh output :
[root@askmdb ~]# /u01/app/oracle/product/18.0.0/dbhome_1/root.sh
Check /u01/app/oracle/product/18.0.0/dbhome_1/install/root_askmdb_2018-08-18_03-13-50-362534151.log for the output of root script
[root@askmdb ~]# cat /u01/app/oracle/product/18.0.0/dbhome_1/install/root_askmdb_2018-08-18_03-13-50-362534151.log
Performing root user operation.

The following environment variables are set as:
     ORACLE_OWNER= oracle
     ORACLE_HOME=  /u01/app/oracle/product/18.0.0/dbhome_1
    Copying dbhome to /usr/local/bin ...
    Copying oraenv to /usr/local/bin ...
    Copying coraenv to /usr/local/bin ...

Entries will be added to the /etc/oratab file as needed by
Database Configuration Assistant when a database is created
Finished running generic part of root script.
Now product-specific root actions will be performed.
Oracle Trace File Analyzer (TFA) is available at : /u01/app/oracle/product/18.0.0/dbhome_1/suptools/tfa/release/tfa_home/bin/tfactl
[root@askmdb ~]#


Pre-Upgrade Information Tool Output ( preupgrade.jar ) :
[oracle@askmdb dbhome_1]$ $ORACLE_HOME/jdk/bin/java -jar  /tmp/askm/preupgrade.jar TERMINAL TEXT
Report generated by Oracle Database Pre-Upgrade Information Tool Version
18.0.0.0.0 on 2018-08-18T03:19:07

Upgrade-To version: 18.0.0.0.0
=======================================
Status of the database prior to upgrade
=======================================
       Database Name:  ASKM
      Container Name:  ASKM
        Container ID:  0
             Version:  12.1.0.2.0
          Compatible:  12.1.0.2.0
           Blocksize:  8192
            Platform:  Linux x86 64-bit
       Timezone File:  18
   Database log mode:  ARCHIVELOG
            Readonly:  FALSE
             Edition:  EE

  Oracle Component                       Upgrade Action    Current Status
   ----------------                       --------------    --------------
   Oracle Server                          [to be upgraded]  VALID
   JServer JAVA Virtual Machine           [to be upgraded]  VALID
   Oracle XDK for Java                    [to be upgraded]  VALID
   Real Application Clusters              [to be upgraded]  OPTION OFF
   Oracle Workspace Manager               [to be upgraded]  VALID
   OLAP Analytic Workspace                [to be upgraded]  VALID
   Oracle Label Security                  [to be upgraded]  VALID
   Oracle Database Vault                  [to be upgraded]  VALID
   Oracle Text                            [to be upgraded]  VALID
   Oracle XML Database                    [to be upgraded]  VALID
   Oracle Java Packages                   [to be upgraded]  VALID
   Oracle Multimedia                      [to be upgraded]  VALID
   Oracle Spatial                         [to be upgraded]  VALID
   Oracle OLAP API                        [to be upgraded]  VALID

==============
BEFORE UPGRADE
==============

  REQUIRED ACTIONS
   ================
   1.  Set DB_RECOVERY_FILE_DEST_SIZE initialization parameter to at least 7955
       MB.  Check alert log during the upgrade to ensure there is remaining free
       space available in the recovery area.

      DB_RECOVERY_FILE_DEST_SIZE is set at 4560 MB.  There is currently 1223 MB
       of free space remaining, which may not be adequate for the upgrade.

      Currently:
        Fast recovery area :  /u01/app/oracle/fast_recovery_area
        Limit              :  4560 MB
        Used               :  3337 MB
        Available          :  1223 MB

      The database has archivelog mode enabled, and the upgrade process will
       need free space to generate archived logs to the recovery area specified
       by initialization parameter DB_RECOVERY_FILE_DEST.  The logs generated
       must not overflow the limit set by DB_RECOVERY_FILE_DEST_SIZE, as that
       can cause the upgrade to not proceed.

  RECOMMENDED ACTIONS
   ===================
   2.  Run 12.1.0.2.0 $ORACLE_HOME/rdbms/admin/utlrp.sql to recompile invalid
       objects.  You can view the individual invalid objects with

        SET SERVEROUTPUT ON;
         EXECUTE DBMS_PREUP.INVALID_OBJECTS;

      58 objects are INVALID.
      There should be no INVALID objects in SYS/SYSTEM or user schemas before
       database upgrade.

  3.  Upgrade Oracle Application Express (APEX) manually before the database
       upgrade.

      The database contains APEX version 4.2.5.00.08. Upgrade APEX to at least
       version 5.1.3.00.05.

      Starting with Oracle Database Release 18, APEX is not upgraded
       automatically as part of the database upgrade. Refer to My Oracle Support
       Note 1088970.1 for information about APEX installation and upgrades.

  4.  (AUTOFIXUP) Gather stale data dictionary statistics prior to database
       upgrade in off-peak time using:

        EXECUTE DBMS_STATS.GATHER_DICTIONARY_STATS;
      Dictionary statistics do not exist or are stale (not up-to-date).
      Dictionary statistics help the Oracle optimizer find efficient SQL
       execution plans and are essential for proper upgrade timing. Oracle
       recommends gathering dictionary statistics in the last 24 hours before
       database upgrade.

      For information on managing optimizer statistics, refer to the 12.1.0.2
       Oracle Database SQL Tuning Guide.

  INFORMATION ONLY
   ================
   5.  To help you keep track of your tablespace allocations, the following
       AUTOEXTEND tablespaces are expected to successfully EXTEND during the
       upgrade process.

                                                 Min Size
       Tablespace                        Size     For Upgrade
       ----------                     ----------  -----------
       SYSAUX                            1010 MB      1129 MB
       SYSTEM                             800 MB      1240 MB
       TEMP                                60 MB       150 MB
       UNDOTBS1                           280 MB       449 MB

      Minimum tablespace sizes for upgrade are estimates.
  ORACLE GENERATED FIXUP SCRIPT
   =============================
   All of the issues in database ASKM
   which are identified above as BEFORE UPGRADE "(AUTOFIXUP)" can be resolved by
   executing the following

    SQL>@/u01/app/oracle/cfgtoollogs/ASKM/preupgrade/preupgrade_fixups.sql
=============
AFTER UPGRADE
=============

  REQUIRED ACTIONS
   ================
   None

  RECOMMENDED ACTIONS
   ===================
   6.  (AUTOFIXUP) If you use the -T option for the database upgrade, then run
       $ORACLE_HOME/rdbms/admin/utluptabdata.sql after the upgrade is complete,
       to VALIDATE and UPGRADE any user tables affected by changes to
       Oracle-Maintained types.

      There are user tables dependent on Oracle-Maintained object types.
      If the -T option is used to set user tablespaces to READ ONLY during the
       upgrade, user tables in those tablespaces, that are dependent on
       Oracle-Maintained types, will not be automatically upgraded. If a type is
       evolved during the upgrade, any dependent tables need to be re-validated
       and upgraded to the latest type version AFTER the database upgrade
       completes.

  7.  Upgrade the database time zone file using the DBMS_DST package.
      The database is using time zone file version 18 and the target 18.0.0.0.0
       release ships with time zone file version 31.

      Oracle recommends upgrading to the desired (latest) version of the time
       zone file.  For more information, refer to "Upgrading the Time Zone File
       and Timestamp with Time Zone Data" in the 18.0.0.0.0 Oracle Database
       Globalization Support Guide.

  8.  (AUTOFIXUP) Gather dictionary statistics after the upgrade using the
       command:

        EXECUTE DBMS_STATS.GATHER_DICTIONARY_STATS;
      Oracle recommends gathering dictionary statistics after upgrade.
      Dictionary statistics provide essential information to the Oracle
       optimizer to help it find efficient SQL execution plans. After a database
       upgrade, statistics need to be re-gathered as there can now be tables
       that have significantly changed during the upgrade or new tables that do
       not have statistics gathered yet.

  9.  Gather statistics on fixed objects after the upgrade and when there is a
       representative workload on the system using the command:

        EXECUTE DBMS_STATS.GATHER_FIXED_OBJECTS_STATS;
      This recommendation is given for all preupgrade runs.
      Fixed object statistics provide essential information to the Oracle
       optimizer to help it find efficient SQL execution plans.  Those
       statistics are specific to the Oracle Database release that generates
       them, and can be stale upon database upgrade.

      For information on managing optimizer statistics, refer to the 12.1.0.2
       Oracle Database SQL Tuning Guide.

  ORACLE GENERATED FIXUP SCRIPT
   =============================
   All of the issues in database ASKM
   which are identified above as AFTER UPGRADE "(AUTOFIXUP)" can be resolved by
   executing the following

    SQL>@/u01/app/oracle/cfgtoollogs/ASKM/preupgrade/postupgrade_fixups.sql

==================
PREUPGRADE SUMMARY
==================
   /u01/app/oracle/cfgtoollogs/ASKM/preupgrade/preupgrade.log
   /u01/app/oracle/cfgtoollogs/ASKM/preupgrade/preupgrade_fixups.sql
   /u01/app/oracle/cfgtoollogs/ASKM/preupgrade/postupgrade_fixups.sql

Execute fixup scripts as indicated below:
Before upgrade log into the database and execute the preupgrade fixups
@/u01/app/oracle/cfgtoollogs/ASKM/preupgrade/preupgrade_fixups.sql

After the upgrade:
Log into the database and execute the postupgrade fixups
@/u01/app/oracle/cfgtoollogs/ASKM/preupgrade/postupgrade_fixups.sql

Preupgrade complete: 2018-08-18T03:19:08
[oracle@askmdb dbhome_1]$


Output of Preupgrade_fixups.sql :
SQL> @/u01/app/oracle/cfgtoollogs/ASKM/preupgrade/preupgrade_fixups.sql
Executing Oracle PRE-Upgrade Fixup Script

Auto-Generated by:       Oracle Preupgrade Script
                          Version: 18.0.0.0.0 Build: 1
Generated on:            2018-08-18 03:18:57

For Source Database:     ASKM
Source Database Version: 12.1.0.2.0
For Upgrade to Version:  18.0.0.0.0

Preup                             Preupgrade
Action                            Issue Is
Number  Preupgrade Check Name     Remedied    Further DBA Action
------  ------------------------  ----------  --------------------------------
     1.  min_recovery_area_size    NO          Manual fixup required.
     2.  invalid_objects_exist     NO          Manual fixup recommended.
     3.  apex_manual_upgrade       NO          Manual fixup recommended.
     4.  dictionary_stats          YES         None.
     5.  tablespaces_info          NO          Informational only.
                                               Further action is optional.

The fixup scripts have been run and resolved what they can. However,
there are still issues originally identified by the preupgrade that
have not been remedied and are still present in the database.
Depending on the severity of the specific issue, and the nature of
the issue itself, that could mean that your database is not ready
for upgrade.  To resolve the outstanding issues, start by reviewing
the preupgrade_fixups.sql and searching it for the name of
the failed CHECK NAME or Preupgrade Action Number listed above.
There you will find the original corresponding diagnostic message
from the preupgrade which explains in more detail what still needs
to be done.

PL/SQL procedure successfully completed.
SQL>


Output of Postupgrade_fixups.sql

SQL> @/u01/app/oracle/cfgtoollogs/ASKM/preupgrade/postupgrade_fixups.sql
Session altered.

PL/SQL procedure successfully completed.

PL/SQL procedure successfully completed.

PL/SQL procedure successfully completed.

Package created.
No errors.
Package body created.

PL/SQL procedure successfully completed.
No errors.


Package created.
No errors.
Package body created.
No errors.
Executing Oracle POST-Upgrade Fixup Script

Auto-Generated by:       Oracle Preupgrade Script
                          Version: 18.0.0.0.0 Build: 1
Generated on:            2018-08-18 03:19:06

For Source Database:     ASKM
Source Database Version: 12.1.0.2.0
For Upgrade to Version:  18.0.0.0.0

Preup                             Preupgrade
Action                            Issue Is
Number  Preupgrade Check Name     Remedied    Further DBA Action
------  ------------------------  ----------  --------------------------------
     6.  depend_usr_tables         YES         None.
     7.  old_time_zones_exist      NO          Manual fixup recommended.
     8.  post_dictionary           YES         None.
     9.  post_fixed_objects        NO          Informational only.
                                               Further action is optional.

The fixup scripts have been run and resovled what they can. However,
there are still issues originally identified by the preupgrade that
have not been remedied and are still present in the database.
Depending on the severity of the specific issue, and the nature of
the issue itself, that could mean that your database upgrade is not
fully complete.  To resolve the outstanding issues, start by reviewing
the postupgrade_fixups.sql and searching it for the name of
the failed CHECK NAME or Preupgrade Action Number listed above.
There you will find the original corresponding diagnostic message
from the preupgrade which explains in more detail what still needs
to be done.

PL/SQL procedure successfully completed.

Session altered.
SQL>


Questions to Readers
Q1) Can we upgrade a database from earlier version to 18c to a read-only ORACLE_HOME ? ( To know more about read-only ORACLE_HOME , Please refer to our post at <> )
Q2) Is it necessary to remove the Oracle Database Express/Database Control before the upgrade ?

Hope this information helps.

Install Oracle Database 18c In Silent Mode Part2

Written By askMLabs on Saturday, September 8, 2018 | 11:50 PM

In this post, we will discuss about the creation of Oracle Database 18c in silent mode. I wrote another post with detailed steps to install Oracle Database 18c in silent mode Install Oracle Database 18c In Silent Mode.

For steps to install Database 18c refer my other posts Oracle Database 18c Simple Installation and Install Oracle Database 18c In Silent Mode. For complete deinstallation of the Oracle Database 18c refer my other post Deinstall/Uninstall Oracle Database 18c.

For this post, we assume that the Oracle Database 18c rdbms binaries are already installed. To install Oracle Database 18c, set the environment variable and then start database creation using dbca.

export ORACLE_BASE=/u01/app/oracle
export ORACLE_HOME=$ORACLE_BASE/product/18.0.0/dbhome_1

$ORACLE_HOME/bin/dbca -silent -createDatabase -gdbName db18c -sid db18c  -templateName General_Purpose.dbc -sysPassword welcome1 -systemPassword welcome1 -emConfiguration DBEXPRESS -dbsnmpPassword welcome1 -listeners LISTENER -createAsContainerDatabase false –ignorePreReqs


The complete session log for Database installation is ….


[oracle@askm18c dbhome_1]$ $ORACLE_HOME/bin/dbca -silent -createDatabase -gdbName db18c -sid db18c  -templateName General_Purpose.dbc -sysPassword welcome1 -systemPassword welcome1 -emConfiguration DBEXPRESS -dbsnmpPassword welcome1 -listeners LISTENER -createAsContainerDatabase false -ignorePreReqs
[WARNING] [DBT-06208] The 'SYS' password entered does not conform to the Oracle recommended standards.
    CAUSE:
a. Oracle recommends that the password entered should be at least 8 characters in length, contain at least 1 uppercase character, 1 lower case character and 1 digit [0-9].
b.The password entered is a keyword that Oracle does not recommend to be used as password
    ACTION: Specify a strong password. If required refer Oracle documentation for guidelines.
[WARNING] [DBT-06208] The 'SYSTEM' password entered does not conform to the Oracle recommended standards.
    CAUSE:
a. Oracle recommends that the password entered should be at least 8 characters in length, contain at least 1 uppercase character, 1 lower case character and 1 digit [0-9].
b.The password entered is a keyword that Oracle does not recommend to be used as password
    ACTION: Specify a strong password. If required refer Oracle documentation for guidelines.
Prepare for db operation
10% complete
Copying database files
40% complete
Creating and starting Oracle instance
42% complete
46% complete
50% complete
54% complete
60% complete
Completing Database Creation
66% complete
70% complete
Executing Post Configuration Actions
100% complete
Database creation complete. For details check the logfiles at:
  /u01/app/oracle/cfgtoollogs/dbca/db18c.
Database Information:
Global Database Name:db18c
System Identifier(SID):db18c
Look at the log file "/u01/app/oracle/cfgtoollogs/dbca/db18c/db18c1.log" for further details.
[oracle@askm18c dbhome_1]$


Verify the database creation using the following steps …..


SQL> select name,user,cdb from v$database;

NAME      USER            CDB
--------- --------------- ---
DB18C     SYS             NO

SQL> select name,user,created,cdb from v$database;

NAME      USER            CREATED   CDB
--------- --------------- --------- ---
DB18C     SYS             16-AUG-18 NO

SQL> select instance_name,status from v$instance;

INSTANCE_NAME    STATUS
---------------- ------------
db18c            OPEN

SQL> select file_name from dba_data_files;

FILE_NAME
----------------------------------------------
/u01/app/oracle/oradata/DB18C/users01.dbf
/u01/app/oracle/oradata/DB18C/undotbs01.dbf
/u01/app/oracle/oradata/DB18C/system01.dbf
/u01/app/oracle/oradata/DB18C/sysaux01.dbf


Following syntax helps to delete the database using dbca.


[oracle@askm18c dbhome_1]$ $ORACLE_HOME/bin/dbca -silent -deleteDatabase -sourceDB db18c -sysDBAUserName sys
Enter SYSDBA user password:

[WARNING] [DBT-19202] The Database Configuration Assistant will delete the Oracle instances and datafiles for your database. All information in the database will be destroyed.
Prepare for db operation
32% complete
Connecting to database
35% complete
39% complete
42% complete
45% complete
48% complete
52% complete
65% complete
Updating network configuration files
68% complete
Deleting instance and datafiles
84% complete
100% complete
Database deletion completed.
Look at the log file "/u01/app/oracle/cfgtoollogs/dbca/db18c/db18c2.log" for further details.
[oracle@askm18c dbhome_1]$


Hope this information helps ….

Delete Database 18c Silent Mode

In this post, Let us discuss the steps to delete database in silent mode. For steps to install Database 18c refer my other posts Oracle Database 18c Simple Installation and Install Oracle Database 18c In Silent Mode.

For complete deinstallation of the Oracle Database 18c refer my other post Deinstall/Uninstall Oracle Database 18c.

The complete syntax of dbca to delete database is here …

[oracle@askm18c response]$ $ORACLE_HOME/bin/dbca -silent -deleteDatabase -help
         -deleteDatabase - Command to Delete a database.
                 -sourceDB <Database unique name for RAC database or SID for Single Instance database>
                 [-unregisterWithDirService <true | false>]
                         -dirServiceUserName <User name for directory service>
                         [-dirServicePassword <Password for directory service>]
                         [-walletPassword <Password for database wallet>]
                 [-deRegisterEMCloudControl ]
                         -emUser <EM Admin username to add or modify targets>
                         -omsHost <EM management server host name>
                         -omsPort <EM management server port number>
                         [-emPassword <EM Admin user password>]
                 [-sysDBAUserName <User name  with SYSDBA privileges>]
                 [-forceArchiveLogDeletion <To delete archive logs of a database>]
                 [-sysDBAPassword <Password for sysDBAUserName user name>]
                 [-sid <Database system identifier>]


Use the following syntax to delete database


[oracle@askm18c response]$ $ORACLE_HOME/bin/dbca -silent -deleteDatabase -sourceDB db18c -sysDBAUserName sys
Enter SYSDBA user password:

[WARNING] [DBT-19202] The Database Configuration Assistant will delete the Oracle instances and datafiles for your database. All information in the database will be destroyed.
Prepare for db operation
32% complete
Connecting to database
35% complete
39% complete
42% complete
45% complete
48% complete
52% complete
65% complete
Updating network configuration files
68% complete
Deleting instance and datafiles
84% complete
100% complete
Database deletion completed.
Look at the log file "/u01/app/oracle/cfgtoollogs/dbca/db18c/db18c0.log" for further details.
[oracle@askm18c response]$


The logfiles to monitor the progress of the database 18c deletion are ….

[root@askm18c db18c]# ls -lrt
-rw-r-----. 1 oracle oinstall     1088 Aug 15 23:46 DBDetails.log
-rw-r-----. 1 oracle oinstall        0 Aug 15 23:46 trace.log_2018-08-15_11-46-19PM.lck
-rw-r-----. 1 oracle oinstall      460 Aug 15 23:46 db18c0.log
-rw-r-----. 1 oracle oinstall   327879 Aug 15 23:46 trace.log_2018-08-15_11-46-19PM
-rw-r-----. 1 oracle oinstall      437 Aug 15 23:46 ShutdownInst.log
[root@askm18c db18c]#


One question to the readers :  Do we need to keep the database up or down for executing the dbca database deletion command ? Please leave your response in comments.


Hope this information helps….

Install Oracle Database 18c In Silent Mode

In this article, let us talk about the silent mode installation of Oracle Database 18c. If you are comfortable with GUI mode installation, please refer my other article Oracle Database 18c Simple Installation. To proceed with the Oracle Database 18c installation, you need to prepare your OS. If your OS is Linux, please refer the article Oracle Database 18c Simple Installation to complete the pre-requisites. If you would like to complete the pre-requisites manually step by step, please refer to the Oracle Document Completing Preinstallation Tasks Manually. For this article, we assume that the pre-installation tasks are completed.

To proceed with the silent mode installation, we need to complete the following  3 steps.

  1. Database 18c Software Installation
  2. Configure the Database Listener
  3. Create database

Following response files supplied by the Oracle Software Image will be modified to update all the required parameter values.

  1. $ORACLE_HOME/install/response/db_install.rsp
  2. $ORACLE_HOME/assistants/netca/netca.rsp
  3. $ORACLE_HOME/assistants/dbca/dbca.rsp


Unzip the software to the ORACLE_HOME location. One important note, from Oracle Database 18c, installation and configuration of Oracle Database software is simplified with image-based installation. You must extract the image software  into the directory where you want your Oracle Database home to be located.


mkdir -p /u01/app/oracle/product/18.0.0/dbhome_1

ls -ld /u01/app

ls -ld /u01/app/oracle/product/18.0.0/dbhome_1

cd /u01/app/oracle/product/18.0.0/dbhome_1

unzip /mnt/software/Database/Oracle_Database_18.0.0.0.0_sw/V978967-01.zip


[oracle@askm18c dbhome_1]$ unzip /mnt/software/Database/Oracle_Database_18.0.0.0.0_sw/V978967-01.zip
..
..
..
     linking: javavm/lib/security/US_export_policy.jar  -> ../../../javavm/jdk/jdk8/lib/security/US_export_policy.jar
  extracting: install/.img.bin
finishing deferred symbolic links:
   bin/lbuilder           -> ../nls/lbuilder/lbuilder
   lib/libocci.so         -> libocci.so.18.1
   lib/libodm18.so        -> libodmd18.so
   lib/libagtsh.so        -> libagtsh.so.1.0
   lib/libclntsh.so       -> libclntsh.so.18.1
   lib/libjavavm18.a      -> ../javavm/jdk/jdk8/lib/libjavavm18.a
   javavm/lib/jce.jar     -> ../../javavm/jdk/jdk8/lib/jce.jar
   javavm/admin/cbp.jar   -> ../../javavm/jdk/jdk8/admin/cbp.jar
   lib/libclntshcore.so   -> libclntshcore.so.18.1
   lib/libclntsh.so.11.1  -> libclntsh.so
   lib/libclntsh.so.10.1  -> libclntsh.so
   precomp/public/ORACA.H -> oraca.h
   precomp/public/SQLCA.H -> sqlca.h
   precomp/public/SQLDA.H -> sqlda.h
   precomp/public/ORACA.COB -> oraca.cob
   precomp/public/SQLCA.COB -> sqlca.cob
   javavm/admin/classes.bin -> ../../javavm/jdk/jdk8/admin/classes.bin
   javavm/admin/libjtcjt.so -> ../../javavm/jdk/jdk8/admin/libjtcjt.so
   javavm/admin/lfclasses.bin -> ../../javavm/jdk/jdk8/admin/lfclasses.bin
   javavm/lib/security/cacerts -> ../../../javavm/jdk/jdk8/lib/security/cacerts
   javavm/lib/sunjce_provider.jar -> ../../javavm/jdk/jdk8/lib/sunjce_provider.jar
   javavm/lib/security/java.security -> ../../../javavm/jdk/jdk8/lib/security/java.security
   javavm/lib/security/local_policy.jar -> ../../../javavm/jdk/jdk8/lib/security/local_policy.jar
   javavm/lib/security/US_export_policy.jar -> ../../../javavm/jdk/jdk8/lib/security/US_export_policy.jar
[oracle@askm18c dbhome_1]$


For Database Software 18c installation, use the response file db_install.rsp. Modify db_install.rsp to update the following parameters.


[oracle@askm18c response]$ cp db_install.rsp db_install.rsp_15AUG2018
[oracle@askm18c response]$ vi db_install.rsp
[oracle@askm18c response]$ diff db_install.rsp db_install.rsp_15AUG2018
29c29
< oracle.install.option=INSTALL_DB_SWONLY
---
> oracle.install.option=
34c34
< UNIX_GROUP_NAME=oinstall
---
> UNIX_GROUP_NAME=
41c41
< INVENTORY_LOCATION=/u01/app/oraInventory
---
> INVENTORY_LOCATION=
45c45
< ORACLE_HOME=/u01/app/oracle/product/18.0.0/dbhome_1
---
> ORACLE_HOME=
50c50
< ORACLE_BASE=/u01/app/oracle
---
> ORACLE_BASE=
62c62
< oracle.install.db.InstallEdition=EE
---
> oracle.install.db.InstallEdition=
79c79
< oracle.install.db.OSDBA_GROUP=dba
---
> oracle.install.db.OSDBA_GROUP=
85c85
< oracle.install.db.OSOPER_GROUP=oper
---
> oracle.install.db.OSOPER_GROUP=
90c90
< oracle.install.db.OSBACKUPDBA_GROUP=backupdba
---
> oracle.install.db.OSBACKUPDBA_GROUP=
95c95
< oracle.install.db.OSDGDBA_GROUP=dgdba
---
> oracle.install.db.OSDGDBA_GROUP=
100c100
< oracle.install.db.OSKMDBA_GROUP=kmdba
---
> oracle.install.db.OSKMDBA_GROUP=
105c105
< oracle.install.db.OSRACDBA_GROUP=racdba
---
> oracle.install.db.OSRACDBA_GROUP=
[oracle@askm18c response]$


[oracle@askm18c response]$ chmod 600 db_install.rsp
[oracle@askm18c response]$ ls -lrt db_install.rsp
-rw-------. 1 oracle oinstall 17969 Aug 15 22:05 db_install.rsp
[oracle@askm18c response]$


Set the environment before starting the Oracle Database 18c Installation.


[oracle@askm18c response]$ export ORACLE_BASE=/u01/app/oracle
[oracle@askm18c response]$ export ORACLE_HOME=$ORACLE_BASE/product/18.0.0/dbhome_1
[oracle@askm18c response]$ echo $ORACLE_HOME
/u01/app/oracle/product/18.0.0/dbhome_1
[oracle@askm18c response]$ echo $ORACLE_BASE
/u01/app/oracle
[oracle@askm18c response]$


Now we are ready to install Oracle Database Software 18c in silent mode.


[oracle@askm18c dbhome_1]$ pwd
/u01/app/oracle/product/18.0.0/dbhome_1
[oracle@askm18c dbhome_1]$ $ORACLE_HOME/runInstaller -silent -responseFile /u01/app/oracle/product/18.0.0/dbhome_1/install/response/db_install.rsp
Launching Oracle Database Setup Wizard...

[WARNING] [INS-13014] Target environment does not meet some optional requirements.
    CAUSE: Some of the optional prerequisites are not met. See logs for details. installActions2018-08-15_10-12-05PM.log
    ACTION: Identify the list of failed prerequisite checks from the log: installActions2018-08-15_10-12-05PM.log. Then either from the log file or from installation manual find the appropriate configuration to meet the prerequisites and fix it manually.
The response file for this session can be found at:
  /u01/app/oracle/product/18.0.0/dbhome_1/install/response/db_2018-08-15_10-12-05PM.rsp

You can find the log of this install session at:
  /tmp/InstallActions2018-08-15_10-12-05PM/installActions2018-08-15_10-12-05PM.log


As a root user, execute the following script(s):
         1. /u01/app/oraInventory/orainstRoot.sh
         2. /u01/app/oracle/product/18.0.0/dbhome_1/root.sh

Execute /u01/app/oraInventory/orainstRoot.sh on the following nodes:
[askm18c]
Execute /u01/app/oracle/product/18.0.0/dbhome_1/root.sh on the following nodes:
[askm18c]


Successfully Setup Software with warning(s).
Moved the install session logs to:
  /u01/app/oraInventory/logs/InstallActions2018-08-15_10-12-05PM
[oracle@askm18c dbhome_1]$


Now run the scripts orainstRoot.sh and root.sh as root user.


[root@askm18c ~]# /u01/app/oraInventory/orainstRoot.sh
Changing permissions of /u01/app/oraInventory.
Adding read,write permissions for group.
Removing read,write,execute permissions for world.

Changing groupname of /u01/app/oraInventory to oinstall.
The execution of the script is complete.
[root@askm18c ~]# /u01/app/oracle/product/18.0.0/dbhome_1/root.sh
Check /u01/app/oracle/product/18.0.0/dbhome_1/install/root_askm18c.askmlabs.com_2018-08-15_22-15-11-598877495.log for the output of root script
[root@askm18c ~]# cat /u01/app/oracle/product/18.0.0/dbhome_1/install/root_askm18c.askmlabs.com_2018-08-15_22-15-11-598877495.log
Performing root user operation.

The following environment variables are set as:
     ORACLE_OWNER= oracle
     ORACLE_HOME=  /u01/app/oracle/product/18.0.0/dbhome_1
    Copying dbhome to /usr/local/bin ...
    Copying oraenv to /usr/local/bin ...
    Copying coraenv to /usr/local/bin ...


Creating /etc/oratab file...
Entries will be added to the /etc/oratab file as needed by
Database Configuration Assistant when a database is created
Finished running generic part of root script.
Now product-specific root actions will be performed.
Oracle Trace File Analyzer (TFA) is available at : /u01/app/oracle/product/18.0.0/dbhome_1/suptools/tfa/release/tfa_home/bin/tfactl
[root@askm18c ~]#


Verify that the inventory is created after successful installation.


[root@askm18c ~]# cat /u01/app/oraInventory/ContentsXML/inventory.xml
<?xml version="1.0" standalone="yes" ?>
<!-- Copyright (c) 1999, 2018, Oracle and/or its affiliates.
All rights reserved. -->
<!-- Do not modify the contents of this file by hand. -->
<INVENTORY>
<VERSION_INFO>
    <SAVED_WITH>12.2.0.4.0</SAVED_WITH>
    <MINIMUM_VER>2.1.0.6.0</MINIMUM_VER>
</VERSION_INFO>
<HOME_LIST>
<HOME NAME="OraDB18Home1" LOC="/u01/app/oracle/product/18.0.0/dbhome_1" TYPE="O" IDX="1"/>
</HOME_LIST>
<COMPOSITEHOME_LIST>
</COMPOSITEHOME_LIST>
</INVENTORY>
[root@askm18c ~]#


NOTE : There is always a conversation about the next step after software installation. Is it listener or database creation that should follow after Database Software installation ?  In our opinion and the best practice is to install Listener and then Oracle Database.

Now let’s proceed with the listener installation. The response file to use to configure listener in silent mode is netca.rsp.

Modify the listener response file as shown below and then run the netca configuration utility with the modified response file.


[oracle@askm18c dbhome_1]$ cd /u01/app/oracle/product/18.0.0/dbhome_1/assistants/netca/
[oracle@askm18c netca]$ cp netca.rsp netca.rsp_15AUG2018
[oracle@askm18c netca]$ vi netca.rsp
[oracle@askm18c netca]$ diff netca.rsp netca.rsp_15AUG2018
46c46
< SHOW_GUI=false
---
> #SHOW_GUI=false
60c60
< LOG_FILE=""/u01/app/oracle/product/18.0.0/dbhome_1/network/tools/log/netca.log""
---
> #LOG_FILE=""/oracle12cHome/network/tools/log/netca.log""
[oracle@askm18c netca]$


[oracle@askm18c netca]$ $ORACLE_HOME/bin/netca -silent -responsefile /u01/app/oracle/product/18.0.0/dbhome_1/assistants/netca/netca.rsp

Wed Aug 15 22:24:54 EDT 2018 Oracle Net Configuration Assistant
Parsing command line arguments:
     Parameter "silent" = true
     Parameter "responsefile" = /u01/app/oracle/product/18.0.0/dbhome_1/assistants/netca/netca.rsp
     Parameter "log" = /u01/app/oracle/product/18.0.0/dbhome_1/network/tools/log/netca.log
Done parsing command line arguments.
Oracle Net Services Configuration:
Profile configuration complete.
Oracle Net Listener Startup:
     Running Listener Control:
       /u01/app/oracle/product/18.0.0/dbhome_1/bin/lsnrctl start LISTENER
     Listener Control complete.
     Listener started successfully.
Listener configuration complete.
Oracle Net Services configuration successful. The exit code is 0
[oracle@askm18c netca]$ ps -ef | grep -i tns
root        36     2  0 21:40 ?        00:00:00 [netns]
oracle    9382     1  0 22:24 ?        00:00:00 /u01/app/oracle/product/18.0.0/dbhome_1/bin/tnslsnr LISTENER -inherit
oracle    9393  1231  0 22:25 pts/0    00:00:00 grep --color=auto -i tns
[oracle@askm18c netca]$


Now at this stage , we have completed Database Software installation and configured Database Listener. Now proceed with creating the Oracle Database 18c.


The response file to use to create a Database is dbca.rsp.


[oracle@askm18c dbca]$ diff dbca.rsp dbca.rsp_15AUG2018
32c32
< gdbName=db18c
---
> gdbName=
42c42
< sid=db18c
---
> sid=
52c52
< databaseConfigType=SI
---
> databaseConfigType=
223c223
< templateName=General_Purpose.dbc
---
> templateName=
233c233
< sysPassword=xxxxxxxx   << Need to enter the desired password
---
> sysPassword=
243c243
< systemPassword=xxxxxxxx  << Need to enter the desired password
---
> systemPassword=
262c262
< emConfiguration=DBEXPRESS
---
> emConfiguration=
295c295
< dbsnmpPassword=xxxxxxxx   << Need to enter the desired password
---
> dbsnmpPassword=
526c526
< listeners=LISTENER
---
> listeners=
[oracle@askm18c dbca]$


Now run the dbca configuration assistant with the response file.


[oracle@askm18c dbca]$ $ORACLE_HOME/bin/dbca -silent -createDatabase  -responseFile /u01/app/oracle/product/18.0.0/dbhome_1/assistants/dbca/dbca.rsp
Prepare for db operation
10% complete
Copying database files
40% complete
Creating and starting Oracle instance
42% complete
46% complete
50% complete
54% complete
60% complete
Completing Database Creation
66% complete
70% complete
Executing Post Configuration Actions
100% complete
Database creation complete. For details check the logfiles at:
  /u01/app/oracle/cfgtoollogs/dbca/db18c.
Database Information:
Global Database Name:db18c
System Identifier(SID):db18c
Look at the log file "/u01/app/oracle/cfgtoollogs/dbca/db18c/db18c.log" for further details.
[oracle@askm18c dbca]$


Once the Database 18c creation is successful, validate the database using the following command.


SQL> select name,user,created,cdb from v$database;

NAME      USER            CREATED   CDB
--------- --------------- --------- ---
DB18C     SYS             15-AUG-18 NO


SQL> select instance_name,status from v$instance;

INSTANCE_NAME    STATUS
---------------- ------------
db18c            OPEN


SQL> !$ORACLE_HOME/bin/lsnrctl status listener

LSNRCTL for Linux: Version 18.0.0.0.0 - Production on 15-AUG-2018 23:24:50

Copyright (c) 1991, 2018, Oracle.  All rights reserved.

Connecting to (DESCRIPTION=(ADDRESS=(PROTOCOL=TCP)(HOST=askm18c)(PORT=1521)))
STATUS of the LISTENER
------------------------
Alias                     LISTENER
Version                   TNSLSNR for Linux: Version 18.0.0.0.0 - Production
Start Date                15-AUG-2018 22:24:55
Uptime                    0 days 0 hr. 59 min. 55 sec
Trace Level               off
Security                  ON: Local OS Authentication
SNMP                      OFF
Listener Parameter File   /u01/app/oracle/product/18.0.0/dbhome_1/network/admin/listener.ora
Listener Log File         /u01/app/oracle/diag/tnslsnr/askm18c/listener/alert/log.xml
Listening Endpoints Summary...
   (DESCRIPTION=(ADDRESS=(PROTOCOL=tcp)(HOST=askm18c)(PORT=1521)))
   (DESCRIPTION=(ADDRESS=(PROTOCOL=ipc)(KEY=EXTPROC1521)))
   (DESCRIPTION=(ADDRESS=(PROTOCOL=tcps)(HOST=askm18c)(PORT=5500))(Security=(my_wallet_directory=/u01/app/oracle/admin/db18c/xdb_wallet))(Presentation=HTTP)(Session=RAW))
Services Summary...
Service "db18c" has 1 instance(s).
   Instance "db18c", status READY, has 1 handler(s) for this service...
Service "db18cXDB" has 1 instance(s).
   Instance "db18c", status READY, has 1 handler(s) for this service...
The command completed successfully

SQL>


To access the Database Express, use the following command to get the port details …


SQL> select dbms_xdb_config.gethttpsport() from dual;

DBMS_XDB_CONFIG.GETHTTPSPORT()
------------------------------
                           5500


Now the Database Express can be accessed using the URL :  https://askm18c.askmlabs.com:5500/em


To monitor the progress of each step or if there are any errors during the installation process, You need to review the following files to know the exact errors.


[root@askm18c db18c]# pwd
/u01/app/oracle/cfgtoollogs/dbca/db18c
[root@askm18c db18c]# ls -lrt
total 19456
-rw-r-----. 1 oracle oinstall        0 Aug 15 23:10 rmanUtil
-rw-r-----. 1 oracle oinstall 18726912 Aug 15 23:11 tempControl.ctl
-rw-r-----. 1 oracle oinstall      387 Aug 15 23:11 CloneRmanRestore.log
-rw-r-----. 1 oracle oinstall     5112 Aug 15 23:16 cloneDBCreation.log
-rw-r-----. 1 oracle oinstall        8 Aug 15 23:16 postScripts.log
-rw-r-----. 1 oracle oinstall      138 Aug 15 23:16 lockAccount.log
-rw-r-----. 1 oracle oinstall     2026 Aug 15 23:19 postDBCreation.log
-rw-r-----. 1 oracle oinstall     1000 Aug 15 23:19 db18c.log
-rw-r-----. 1 oracle oinstall   823155 Aug 15 23:19 trace.log_2018-08-15_11-09-39PM
[root@askm18c db18c]#


Hope this helps.

 
Support :
Copyright © 2013. askMLabs - All Rights Reserved
Proudly powered by Blogger