facebook twitter youtube facebook facebook facebook

E-Mail : info@askmlabs.com

Phone : +1.215.353.8306

Latest Post
Showing posts with label oem 12c. Show all posts

OEM LDAP Authentication Troubleshooting

Written By askMLabs on Wednesday, September 12, 2018 | 10:38 PM

In this post, we will discuss  troubleshooting OEM LDAP authentication issue. Due to various reasons, you may see sometimes the OEM users (LDAP users) getting Authentication failures. Well there could be various reasons for the authentication failures. We need to see how can we enable the tracing/debug to populate the detailed error messages in logs. The procedure is also explained in the Oracle Document.

Our troubleshooting started after users compaining about the authentication issues. We narrowed it with various testings/accessing other enterprise applications that the issue is only with the OEM. Now we have started our focus on troubleshooting authentication issue.

Check1 :

Check if the issue is with all the users ( Local and External ). If the issue is only with the External users(LDAP users), the primary focus of this post, Please proceed with the troubleshooting.

Knowing that the issue is only with the LDAP users, We focussed looking around the external ldap system. In our case, we are using Microsoft Active Directory to authenticate users to OEM.

Check2:

Check if the service account used to integrate for authentication is locked. The security/identity team in your Organization should be able to help you if the accout is locked or not. If the account is locked, Please have this account unlocked it. Verify if the issue is resolved.  But if the issue is not with the account locked, proceed to the next step to continue troubleshooting ….

Check3:

If the issue is not with the account locked, try enabling the Weblogic Debug/Tracing as described below ……

From the WebLogic Server Console, enable logging, set the WebLogic debug log level and then the enable the debug flag.

  1. Navigate to Environment->Servers->EMGC_OMS1 and choose the Logging tab.
  2. Under Rotation, set the file rotation size to 64000.
  3. Expand Advanced.
  4. Under Message destinations(s) (Log file: region) set the Severity level to Trace.
  5. Navigate to the Environment->Servers->EMGC_OMS1 and choose the Debug tab.
  6. Check WebLogic->security->atn->DebugSecurityAtn.
  7. Click Save.


Now these settings will create a logfile ldap_trace.logATN. This file ldap_trace.logATN is located at $OMS_HOME/../../gc_inst/user_projects/domains/GCDomain


Following log messages are populated when we try to access the OEM using LDAP user accounts….


[oracle@askmoem12c GCDomain]$ tail -f ldap_trace.logATN
17:31:47.729 ldc=6 Connected to ldaps://adauth.askmlabs.com:389
17:31:47.730 ldc=6 op=227 BindRequest {version=3, name=CN=oem.service,OU=Users,OU=Accounts,DC=askmlabs,DC=com, authentication=********}
17:31:47.732 ldc=6 op=227 BindResponse {resultCode=49, errorMessage=80090308: LdapErr: DSID-0C09042F, comment: AcceptSecurityContext error, data 532, v2580}
17:32:30.334 ldc=7 Connected to ldaps://adauth.askmlabs.com:389
17:32:30.334 ldc=7 op=228 BindRequest {version=3, name=CN=oem.service,OU=Users,OU=Accounts,DC=askmlabs,DC=com, authentication=********}
17:32:30.336 ldc=7 op=228 BindResponse {resultCode=49, errorMessage=80090308: LdapErr: DSID-0C09042F, comment: AcceptSecurityContext error, data 532, v2580}
17:35:00.485 ldc=8 Connected to ldaps://adauth.askmlabs.com:389
17:35:00.485 ldc=8 op=229 BindRequest {version=3, name=CN=oem.service,OU=Users,OU=Accounts,DC=askmlabs,DC=com, authentication=********}
17:35:00.487 ldc=8 op=229 BindResponse {resultCode=49, errorMessage=80090308: LdapErr: DSID-0C09042F, comment: AcceptSecurityContext error, data 532, v2580}
17:37:06.171 ldc=9 Connected to ldaps://adauth.askmlabs.com:389
17:37:06.171 ldc=9 op=230 BindRequest {version=3, name=CN=oem.service,OU=Users,OU=Accounts,DC=askmlabs,DC=com, authentication=********}
17:37:06.174 ldc=9 op=230 BindResponse {resultCode=49, errorMessage=80090308: LdapErr: DSID-0C09042F, comment: AcceptSecurityContext error, data 532, v2580}
17:39:45.033 ldc=10 Connected to ldaps://adauth.askmlabs.com:389
17:39:45.033 ldc=10 op=231 BindRequest {version=3, name=CN=oem.service,OU=Users,OU=Accounts,DC=askmlabs,DC=com, authentication=********}
17:39:45.035 ldc=10 op=231 BindResponse {resultCode=49, errorMessage=80090308: LdapErr: DSID-0C09042F, comment: AcceptSecurityContext error, data 52e, v2580}
17:47:17.121 ldc=2 Connected to ldaps://adauth.askmlabs.com:389
17:47:17.122 ldc=2 op=223 BindRequest {version=3, name=CN=oem.service,OU=Users,OU=Accounts,DC=askmlabs,DC=com, authentication=********}
17:47:17.124 ldc=2 op=223 BindResponse {resultCode=49, errorMessage=80090308: LdapErr: DSID-0C09042F, comment: AcceptSecurityContext error, data 532, v2580}
^C


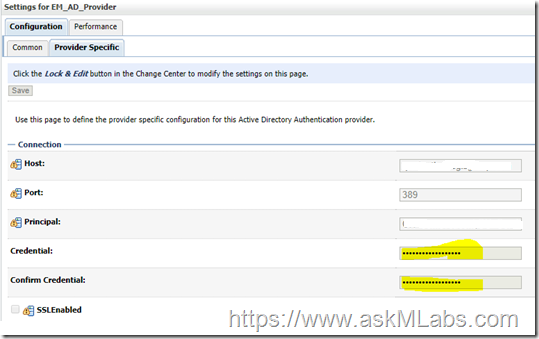
From the above error messages, the “resultCode=49” indicates that the bad password is used. Now we understand that the issue is to deal with the service account password. We changed the service account oem.service password and then updated the password in weblogic console as shown below.


Follow the navigation to update the password ….

Domain - > Environment - > Security Realms - > myrealm - > providers

image

image

image

image


Save the password. And then activate the changes.


Ideally we don’t  need to bounce the services to take these changes effect. But if you could offer the bounce, please bounce the complete OEM services.


Hope this information helps….

Migrating Level-4 OEM to New Datacenter With Zero Downtime

Written By askMLabs on Thursday, December 15, 2016 | 10:01 PM

I am working on a project to migrate a level-4 OEM(Oracle Enterprise Manager) running on Oracle Database Appliances(ODA) from one Datacenter to another Datacenter. I am also planning to write a white paper on this and will  submit to Oracle.

I proposed the following action plan to migrate these ODAs to new datacenter with zero downtime. 

I am going to explain the outlined procedure to perform this activity in the present article, but will also write some more articles on the same topic with detailed step by step procedure.

In order to understand this article, Please note the following keywords.
  • OEM - Oracle Enterprise Manager
  • ODA - Oracle Database Appliance
  • OMR - Oracle Management Repository ( Oracle Database )
  • OMS - Oracle Management Service
  • OMA - Oracle Management Agent
  • PDC - Primary Datacenter
  • SDC - Second Datacenter or Standby Datacenter
  • TDC - Third Datacenter
  • DNS - Domain Name Service

Present Setup : 
  • Two primary ODAs with 12.1.0.4 OEM 12c installed - At PDC
  • Two secondary ODAs with 12.1.0.4 OEM 12c (Standby with ASM replication from primary for OMS binaries) - At SDC
  • Database and Grid are on 11.2.0.3
  • Oracle Database is two instance RAC both on primary and secondary
  • ODAs are with old control version (oakcli)
Targetted Setup : 
  • Two primary ODAs with 12.1.0.4 OEM 12c - At PDC 
  • Two secondary ODAs with 12.1.0.4 OEM 12c (Standby with ASM replication from primary for OMS binaries) - At TDC
  • Database with 12.1.0.2 and 11.2.0.3
  • Grid with 12.1.0.2 ( without flex ) 
  • Oracle Database is two instance RAC both on primary and secondary
  • ODAs with the latest control version ( oakcli )

Slide-1

  • Primary ODAs at PDC are hosting OEM12c with 12.1.0.4 version. The database is RAC and it has two OMS services  running.
  • Secondary ODAs at SDC are standby for Primary and it hosts the same versions as primary.
  • The primary to secondary OMS replication is setup using ASM file system. So it is ASM replication from primary to secondary. ( Note that it is not standby weblogic setup ) . Please read my other article on how to convert Standby weblogic Server setup to ASM replicaiton.

Slide-2

  • The secondary datacenter SDC will be replaced with a third datacenter TDC. So we got new ODAs and they are stacked and installed at new datacenter. These ODAs are called toda01 and toda02. The next step is to create a new standby database at TDC with primary database at PDC.
  • Grid software will be 12.1.0.2.
  • Database software will be 11.2.0.3 and 12.1.0.2 ( Need to install both the binaries, so that the latest version can be used for database upgrade)
Slide-3
  • In this step, we are going to create a new standby database TOEMDB for the primary database POEMDB. At this point of time, we have  two standby databases up and running. We need to make sure that the archive logs are shipped to both the standby locations. Once the second standby database is created, we need to prepare the toda's for the OMS creation.
Slide-4
  • We need to prepare the ODAs at TDC for ASM replication. The procedure and detailed steps will be posted in a different article. 
  • Disable the ASM replication from PDC to SDC.
  • Enable the ASM replication from PDC to TDC.
  • Note that, at this point, we still have two standby databases, but only one ASM replication from PDC to TDC. The DNS is still pointing to SDC.
Slide-5
  • Now the standby setup for database at SDC can be disabled. Need to remove all the configurations for SDC standby database at primary database running at PDC.
  • Now primary database is at PDC and One Standby Database is at TDC. Primary OMS is at PDC and Standby OMS is at TDC.
  • DNS ( loadbalancer ) updates need to be done to reflect the new ODAs at TDC. All the references for ODAs at SDC should be removed from DNS and loadbalancer.
Slide-6
  • We can now switch off or decommission the ODAs at SDC as per your enterprise standards.
  • At this point, we have PDC as primary OEM and TDC with the standby OEM setup.
  • Database at PDC is with 11.2.0.3 and at TDC with 11.2.0.3. Note that we still have binaries 12.1.0.2 created for future database upgrade.
  • Grid at PDC is 11.2.0.3 and Grid at TDC is 12.1.0.2.
  • ODA control software oakcli is with old version at PDC and at latest version at TDC.

Slide-7
  • The OEM setup looks as shown above after completely replacing the SDC datacenter ODAs with TDC ODAs.

Now we are going to repeat the same steps for replacing the ODAs at PDC. For this replacement, we are using the same datacenter PDC. So in the same datacenter PDC, we will replace the old ODAs with the new ODAs. For this to perform ,we need to switch the roles of the present OEM.

Slide-8
  • Rack and stack the ODAs at FDC.
  • Database with version 11.2.0.3 and 12.1.0.2
  • Grid wit h12.1.0.2 version.
Slide-9
  • Swith the roles of the OEMs at PDC and TDC.
  • Once the OEM at PDC is standby, we can repeat the same steps from 1-7.
Slide-10
Slide-11

Slide-12

Slide-13


Slide-14
  • When the ODAs at PDC are replaced completely with new ODAs, we can switch back the roles. So that, ODAs at PDC will run the primary OEM and PDAs at TDC will run the standby OEM.


The Complete procedure is shown in the following flow diagram for easy reference to understand what we are doing at each stage.


Hope this information helps you to understand the migration of  Level-4 OEM with zero downtime.

Please comment or reply to me if you have any questions or doubts.

Thanks
SRI

Agent 12c Deployment On Linux Host - Add host targets method

Written By askMLabs on Sunday, March 2, 2014 | 7:07 AM

In this article, i am explaining the oem agent 12c deployment on linux host. My OMS and OMR are installed on Linux OS and so i have agent software already available in the software library. We need to download the agent software to OMS software library, If i don't have the agent software for which i am going to install agent is not available. I will explain in my other article on how to download agent software to oem software library (in online and offline method) and deploy it to host.

I am deploying the agent using add host targets wizard method. But there are other ways like silent and emcli methods to deploy the agent on to target servers. Refer my other articles for silent and emcli methods of installing agents on to target servers.


1) Ensure you have agent software available in OMS software library
2) Hardware requirements :
The following are the CPU, RAM, and hard disk space requirements for installing Management Agents.
    For a standalone Management Agent, ensure that you have 2 CPU cores per host, 512 MB of RAM, and 1 GB of free hard disk space.
    For a Master Agent, ensure that you have 2 CPU cores per host, 512 MB of RAM, and 1 GB of free hard disk space.
    For a Shared Agent, ensure that you have 2 CPU cores per host, 512 MB of RAM, and 15 MB of free hard disk space.
3) Package Requirements : 
You need to install all the packages mentioned in below table on agent deployment or target server.
Platform
64-Bit Packages for 64-Bit Platform
Oracle Linux 6.x
(Red Hat 6 Kernel and Unbreakable Enterprise Kernel (UEK))
  • make-3.81
  • binutils-2.20.51.0.2-5.11
  • gcc-4.4.4
  • libaio-0.3.107
  • glibc-common-2.12-1.7
  • libstdc++-4.4.4
  • sysstat-9.0.4

4) Create necessary user and group for agent installation on target server:
# /usr/sbin/groupadd oinstall
# /usr/sbin/useradd -g oinstall oracle
# passwd oracle

5) Configure sudo access to the created user ( oracle ) to run script as root user. ( Optional )
6) Open any ports in firewall on target server. Make sure ports 22 and 3872
7) Create a directory on target server where you are going to install agent binaries.
8) Now access the 12c grid control to deploy agent on to target server.


OEM 12C CLOUD CONTROL INSTALLATION - Advanced Option

In this article, we will see 12c oem grid control installation. There are two types of installations for oem grid control, simple installation and advanced installation. We are going to see advanced installation in this article.

  1. 1.Software
  2. 2.OS installation
  3. 3.Database Installation
  4. 4.Oem 12c Prerequisites
    1. a.Hardware Requirements
    2. b.Operating System Requirements
    3. c.Package Requirements
    4. d.Kernel Parameter Requirements
    5. e.Library Requirements
    6. f.Operating System Groups and Users Requirements
    7. g.Unique Host Name and Static IP Address Requirements
    8. h.Temporary Directory Space Requirements
    9. i.Central Inventory Requirements
    10. j.UMASK Value Requirements
    11. k.File Descriptor Requirements
    12. l.Existing Database Version Requirements
    13. m.Host File Requirements
    14. n.Port Requirements
  5. 5.Oem 12c Installation Procedure
  6. 6.Verification Checks
  7. 7.Starting and Stopping oem 12c Services

1. Software : 
The required software for the oem 12c cloud control are :

  • CentOS 6.5 (x86_64)  Download
  • Oracle Database 12c (x86_64)  Download
  • Enterprise Manager Cloud Control 12c (12.1.0.3) (x86_64) Download

2. OS Installation :
We are using CentOS 6.5 for this installation. Please download the latest software and install OS. While installing the OS select the option to install database server, so the most of the required rpms will be installed by default.

3. Database Installation :
Please follow my article Database 12c Installation on CentOS 6.5 for database installation. We need to have the database installed for oem 12c installation. It is called oracle management repository. Oracle database 12c is not yet certified with the oem 12c at the time i am writing this article. But i used database 12c as OMR for oem 12c installation.
Please complete all the following pre-requisite on OMR
[oracle@fsrsrv10 oem12c]$ sqlplus '/as sysdba'
SQL*Plus: Release 12.1.0.1.0 Production on Mon Feb 24 03:04:33 2014
Copyright (c) 1982, 2013, Oracle.  All rights reserved.

Connected to:
Oracle Database 12c Enterprise Edition Release 12.1.0.1.0 - 64bit Production
With the Partitioning, OLAP, Advanced Analytics and Real Application Testing options
SQL> sho parameter session_cached
NAME                                 TYPE        VALUE
------------------------------------ ----------- ------------------------------
session_cached_cursors               integer     50
SQL> sho parameter shared_
NAME                                 TYPE        VALUE
------------------------------------ ----------- ------------------------------
hi_shared_memory_address             integer     0
max_shared_servers                   integer
shared_memory_address                integer     0
shared_pool_reserved_size            big integer 95630131
shared_pool_size                     big integer 0
shared_server_sessions               integer
shared_servers                       integer     1
SQL> alter system set session_cached_cursors=200 scope=both;
alter system set session_cached_cursors=200 scope=both
                 *
ERROR at line 1:
ORA-02096: specified initialization parameter is not modifiable with this
option

SQL> desc v$log
 Name                                      Null?    Type
 ----------------------------------------- -------- ----------------------------
 GROUP#                                             NUMBER
 THREAD#                                            NUMBER
 SEQUENCE#                                          NUMBER
 BYTES                                              NUMBER
 BLOCKSIZE                                          NUMBER
 MEMBERS                                            NUMBER
 ARCHIVED                                           VARCHAR2(3)
 STATUS                                             VARCHAR2(16)
 FIRST_CHANGE#                                      NUMBER
 FIRST_TIME                                         DATE
 NEXT_CHANGE#                                       NUMBER
 NEXT_TIME                                          DATE
 CON_ID                                             NUMBER
SQL> desc v$logname
ERROR:
ORA-04043: object v$logname does not exist

SQL> desc v$logfile
 Name                                      Null?    Type
 ----------------------------------------- -------- ----------------------------
 GROUP#                                             NUMBER
 STATUS                                             VARCHAR2(7)
 TYPE                                               VARCHAR2(7)
 MEMBER                                             VARCHAR2(513)
 IS_RECOVERY_DEST_FILE                              VARCHAR2(3)
 CON_ID                                             NUMBER
SQL> select group#,thread#,bytes/1024/1024 from v$log;
    GROUP#    THREAD# BYTES/1024/1024
---------- ---------- ---------------
         1          1              50
         2          1              50
         3          1              50
SQL> select group#,thread#,MEMBERS,bytes/1024/1024 from v$log;
    GROUP#    THREAD#    MEMBERS BYTES/1024/1024
---------- ---------- ---------- ---------------
         1          1          1              50
         2          1          1              50
         3          1          1              50
SQL> select member from v$logfile;
MEMBER
--------------------------------------------------------------------------------
/home/apps/oem12c/oradata/oem12c/redo03.log
/home/apps/oem12c/oradata/oem12c/redo02.log
/home/apps/oem12c/oradata/oem12c/redo01.log
SQL> alter database add logfile thread 1 group 4 ('/home/apps/oem12c/oradata/oem12c/redo04.log') size 300M;
Database altered.
SQL> alter database add logfile thread 1 group 5 ('/home/apps/oem12c/oradata/oem12c/redo05.log') size 300M;
Database altered.
SQL> alter database add logfile thread 1 group 6 ('/home/apps/oem12c/oradata/oem12c/redo06.log') size 300M;
Database altered.
SQL> select member,status  from v$logfile;
MEMBER
--------------------------------------------------------------------------------
STATUS
-------
/home/apps/oem12c/oradata/oem12c/redo03.log

/home/apps/oem12c/oradata/oem12c/redo02.log

/home/apps/oem12c/oradata/oem12c/redo01.log


MEMBER
--------------------------------------------------------------------------------
STATUS
-------
/home/apps/oem12c/oradata/oem12c/redo04.log

/home/apps/oem12c/oradata/oem12c/redo05.log

/home/apps/oem12c/oradata/oem12c/redo06.log


6 rows selected.
SQL> select group#,thread#,MEMBERS,status,bytes/1024/1024 from v$log;
    GROUP#    THREAD#    MEMBERS STATUS           BYTES/1024/1024
---------- ---------- ---------- ---------------- ---------------
         1          1          1 INACTIVE                      50
         2          1          1 CURRENT                       50
         3          1          1 INACTIVE                      50
         4          1          1 UNUSED                       300
         5          1          1 UNUSED                       300
         6          1          1 UNUSED                       300
6 rows selected.
SQL> alter database drop logfile group 1;
Database altered.
SQL> alter database drop logfile group 3;
Database altered.
SQL> atler system switch logfile;
SP2-0734: unknown command beginning "atler syst..." - rest of line ignored.
SQL> alter system switch logfile;
System altered.
SQL> alter system checkpoint;
System altered.
SQL> select group#,thread#,MEMBERS,status,bytes/1024/1024 from v$log;
    GROUP#    THREAD#    MEMBERS STATUS           BYTES/1024/1024
---------- ---------- ---------- ---------------- ---------------
         2          1          1 INACTIVE                      50
         4          1          1 CURRENT                      300
         5          1          1 UNUSED                       300
         6          1          1 UNUSED                       300
SQL> alter database drop logfile group 2;
Database altered.
SQL> select group#,thread#,MEMBERS,status,bytes/1024/1024 from v$log;
    GROUP#    THREAD#    MEMBERS STATUS           BYTES/1024/1024
---------- ---------- ---------- ---------------- ---------------
         4          1          1 CURRENT                      300
         5          1          1 UNUSED                       300
         6          1          1 UNUSED                       300
SQL> alter system set session_cached_cursors=250 scope=spfile;
System altered.
SQL> alter system set shared_pool_size=600M scope=spfile;
System altered.
SQL>


SQL> shut immediate
Database closed.
Database dismounted.
ORACLE instance shut down.
SQL> startup
ORACLE instance started.
Total System Global Area 1.5132E+10 bytes
Fixed Size                  3092488 bytes
Variable Size            1040191480 bytes
Database Buffers         1.4059E+10 bytes
Redo Buffers               29700096 bytes
Database mounted.
Database opened.
SQL> sho parameter session_cached_cursors
NAME                                 TYPE        VALUE
------------------------------------ ----------- ------------------------------
session_cached_cursors               integer     250
SQL> sho parameter shared_pool_size
NAME                                 TYPE        VALUE
------------------------------------ ----------- ------------------------------
shared_pool_size                     big integer 608M
SQL>
4.OEM 12c Pre-Requisites : 
4.a Hardware requirements : CPU, RAM, Heap Size, and Hard Disk Space requirements vary depending on the type of installation we are choosing. Please review the here to know the exact hardware requirements.

4.b Operating System Requirements :
Ensure that you install Enterprise Manger Cloud Control only on certified operating system as mentioned in the Enterprise Manager Certification Matrix.

4.c Package Requirements: Though we are using CentOS6.5, we will follow Linux 6.x requirement for the installation.
For OMS : 
Platform
64-Bit Packages for 64-Bit Platform
Oracle Linux 6.x
(Red Hat 6 Kernel and Unbreakable Enterprise Kernel (UEK))


  • make-3.81
  • binutils-2.20.51.0.2-5.11
  • gcc-4.4.4
  • libaio-0.3.107
  • glibc-common-2.12-1
  • libstdc++-4.4.4
  • libXtst-1.0.99.2-3.el6.x86_64.rpm
  • sysstat-9.0.4
  • glibc-devel-2.12-1.7.el6.i686 (This is a 32-bit package)
  • glibc-devel-2.12-1.7.el6.x86_64 (This is a 64-bit package)
  • (Applicable only for Oracle Linux 6.2, which includes RH6.2 and UEK 6.2) glibc-2.12-1.47.0.2

For Agent : 
Platform
64-Bit Packages for 64-Bit Platform
Oracle Linux 6.x
(Red Hat 6 Kernel and Unbreakable Enterprise Kernel (UEK))
  • make-3.81
  • binutils-2.20.51.0.2-5.11
  • gcc-4.4.4
  • libaio-0.3.107
  • glibc-common-2.12-1.7
  • libstdc++-4.4.4
  • sysstat-9.0.4
4.d Kernel Parameter Requirements
For installing an OMS or a Management Agent on Unix operating systems (32-bit or 64-bit), set the kernel.shmmax parameter to a value 1 byte less than 4 GB or 4294967295.

4.e Library Requirements :
Install glibc-2.5.12 package

4.f.Operating System Groups and Users Requirements:
# /usr/sbin/groupadd oinstall
# /usr/sbin/useradd -g oinstall oracle
# passwd oracle

4.g Host Name and Static IP Address Requirements :
Ensure that you check the network configuration to verify that the host on which you are installing resolves to a unique host name and a static IP address that is visible to other hosts in the network.
You must use a static IP address. If you use a dynamic IP address, the installation might fail.
Ensure that the host name specified in /etc/hosts file is unique, and that it maps to the correct IP address. Following is the recommended format of the /etc/hosts file:
<ip address> <fully_qualified_host_name> <short_host_name>
If the DNS server is configured, then it should resolve the host name for the OMS machine correctly. For example, all these command must return the same output:
nslookup host1
nslookup host1.foo.com
nslookup 141.81.5.71

4.h.Temporary Directory Space Requirements :
Ensure that you allocate 400 MB of space for a temporary directory where the executables can be copied.

4.i.Central Inventory Requirements :
Ensure that you allocate 100 MB of space for the central inventory directory.
 Also ensure that the central inventory directory is not on a shared file system. If it is already on a shared file system, then switch over to a non-shared file system by following the instructions outlined in My Oracle Support note 1092645.1.
To determine whether the Oracle Inventory group exists, enter the following command:
     $ more /etc/oraInst.loc
     If the oraInst.loc file exists, then the output from this command looks like:
     inventory_loc=/u01/app/oracle/oraInventory
     inst_group=oinstall

4.j.UMASK Value Requirements:
Ensure that you set the default file mode creation mask (umask) to 022 in the shell startup file.

4.k.File Descriptor Requirements :
If the current value is less than 4096, then as root user, update the /etc/security/limits.conf file as shown below:
         <UID> soft nofile 4096
         <UID> hard nofile 4096

4.l.Existing Database Version Requirements :
Ensure that the database is patched with all the Patch Set Updates (PSU) or Critical Patch Updates (CPU) released for that release. Also ensure that you apply the patches.
The database can also have the Automatic Memory Management (AMM) feature enabled.

4.m.Host File Requirements :
Ensure that the host name specified in the /etc/hosts file is unique, and ensure that it maps to the correct IP address of that host. Otherwise, the installation can fail on the product-specific prerequisite check page.
The following is the recommended format of the /etc/hosts file:
<ip> <fully_qualified_host_name> <short_host_name>

4.n.Port Requirements :
Ensure that the ports you assign (within the given range) to the following components are free and available:
    • Admin Server HTTP SSL Port = 7101 - 7200
    • Enterprise Manager Upload HTTP Port = 4889 - 4898
    • Enterprise Manager Upload HTTP SSL Port = 1159, 4899 - 4908
    • Enterprise Manager Central Console HTTP Port = 7788 - 7798
    • Enterprise Manager Central Console HTTP SSL Port = 7799 - 7809
    • Oracle Management Agent Port = 3872, 1830 - 1849
    • Node Manager = 7101 - 7200
    • Managed Server HTTP Port = 7201 - 7300
    • Managed Server HTTPS Port = 7301 - 7400
5. Oem 12cR3 Installation Procedure :(Advanced)


[root@fsrsrv10 apps]# /home/apps/oem12c/middleware/oms/allroot.sh

Starting to execute allroot.sh .........

Starting to execute /home/apps/oem12c/middleware/oms/root.sh ......
Running Oracle 11g root.sh script...

The following environment variables are set as:
    ORACLE_OWNER= oracle
    ORACLE_HOME=  /home/apps/oem12c/middleware/oms

Enter the full pathname of the local bin directory: [/usr/local/bin]:
The file "dbhome" already exists in /usr/local/bin.  Overwrite it? (y/n)
[n]:
The file "oraenv" already exists in /usr/local/bin.  Overwrite it? (y/n)
[n]:
The file "coraenv" already exists in /usr/local/bin.  Overwrite it? (y/n)
[n]:

Entries will be added to the /etc/oratab file as needed by
Database Configuration Assistant when a database is created
Finished running generic part of root.sh script.
Now product-specific root actions will be performed.
/etc exist

Creating /etc/oragchomelist file...
/home/apps/oem12c/middleware/oms
Finished execution of  /home/apps/oem12c/middleware/oms/root.sh ......


6.Verification Checks :
Access the following URL with sysman user and navigate to different pages to verify everything looks good.
                   https://<oms hostname>:7802/em

7.Starting and Stopping oem 12c Services :
Use the following commands to start all components :
    $ export ORACLE_HOME=/u01/app/oracle/product/12.1.0/dbhome_1
    $ export OMS_HOME=/u01/app/oracle/Middleware/oms
    $ export AGENT_HOME=/u01/app/oracle/Middleware/agent/core/12.1.0.3.0
    # Start everything
    $ $ORACLE_HOME/bin/sqlplus '/as sysdba'
    SQL> startup
 
    $lsnrctl start listener
    $ $OMS_HOME/bin/emctl start oms
    $ $AGENT_HOME/bin/emctl start agent

Use the following commands to stop all components :
    $ export ORACLE_HOME=/u01/app/oracle/product/12.1.0/dbhome_1
    $ export OMS_HOME=/u01/app/oracle/Middleware/oms
    $ export AGENT_HOME=/u01/app/oracle/Middleware/agent/core/12.1.0.3.0
    # Stop everything
   $  $OMS_HOME/bin/emctl stop oms -all
   $  $AGENT_HOME/bin/emctl stop agent
    $ $ORACLE_HOME/bin/sqlplus '/as sysdba'
    SQL> shut immediate
 
    $ $lsnrctl stop listener

 
Support :
Copyright © 2013. askMLabs - All Rights Reserved
Proudly powered by Blogger